Installation
Installation is easy and straightforward, as shown in our video at https://www.youtube.com/watch?v=u25vBHq-s6Y.
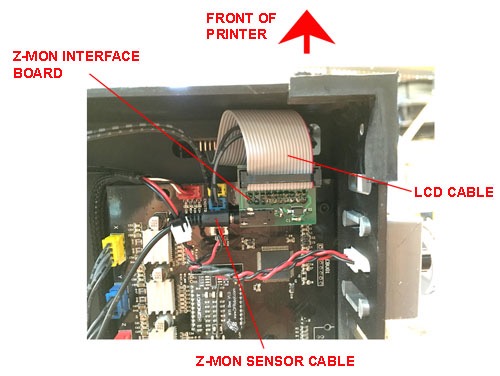
Please do remember that the interface board goes in series with the LCD cable, not the extruder cable!
Details of Z-Mon’s Operation
When loading filament, Z-Mon's LED will flash green for about 8 seconds. During this time the monitor is “arming”, and unloading the filament during that time will have no effect. This allows you to fumble around during loading without generating spurious “button presses” in the printer UI.
Once the monitor is armed, the LED goes steady green. If the filament is then removed, the LED will flash red for two seconds – as with arming, during this time the filament can be restored without generating a pause signal – this protects against momentary faults or opening of the switch for any reason.
After the two seconds of flashing red, a 6.5-second “simulated button press” is generated and sent to the motherboard in order to pause the printer. During this "button press", the LED will flash orange, and the front panel button will not respond – typically you wouldn’t even be around at this time, so it shouldn’t be an issue.
Note that generally, the M200® will not respond to Z-Mon’s pause signal while raft building; the firmware requires a very long “button press” during this time.
Unloading Filament and Removing Z-Mon
When you unload filament from Z-Mon while it’s connected to the printer, it will generate a “pause signal” just as if it’d run out during printing. Generally this isn’t an issue since the M200’s firmware requires a confirmation for just about every action, but it’s also quite easy to prevent the pause signal from being generated - simply unplug the cable from Z-Mon while doing maintenance, and then plug it back in again once you’re ready to print.
Mounting Options and Considerations
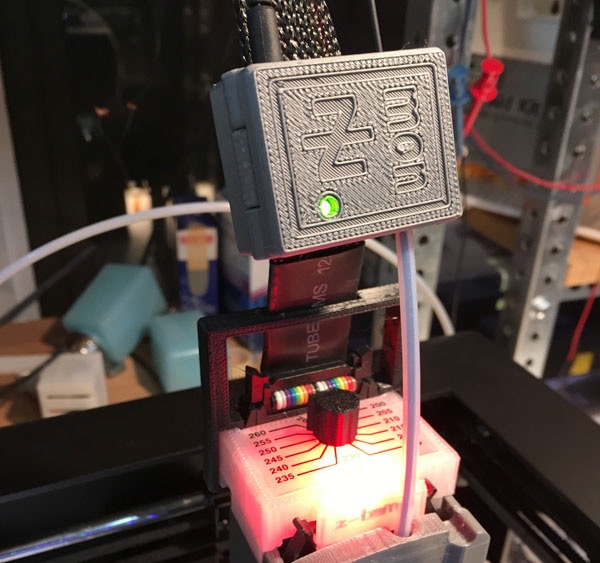
Z-Mon can be positioned anywhere in the filament path, but it should not be rigidly mounted - it must be free to pivot slightly as the print head moves around the build plate and as the tension and amount of filament varies. If it’s rigidly mounted, there may be some combination of factors that cause the filament to bind in the monitor, possibly causing its magnetic catch to release, resulting in an unwanted pause. Clipping it to the ribbon cable allows sufficient mobility for proper operation. When using the rear chassis mount, fasten the mount to the monitor using only the top screw, so that the monitor is free to pivot in response to the changing filament angle off the spool, like this:
Fasten the Rear Chassis Mount with Only the Top Screw So It Can Pivot
Note also that when rear-mounted, Z-Mon should be “upside-down” as shown here:
Rear mount remixed from a design by ThingiVerse user BbrnKyle: http://www.thingiverse.com/thing:238138 under CC-Attribution-Share Alike license.
Recommended Accessories
This snap-on vertical ribbon cable support for Z-Temp is highly recommended if you’re clipping your Z-Mon to the ribbon cable:
http://www.thingiverse.com/thing:1784126
Use 110-120mm of PTFE guide tube between Z-Mon and the printer to add stability and support for the monitor. Without this tube, the monitor may open during printing. Guide tubing above the monitor is not necessary if using overhead feed.
These clips help keep your Z-Mon cable neat and tidy:
http://www.thingiverse.com/thing:1784174
